
The workspace
Views, docks, workspaces and keyboard shortcuts, and how to change them.
The editor is a set of views: the Camera, the Timeline, the Colour view and so on. You decide which views are open and where they sit, and you can save the arrangement and come back to it. This page shows how.
Cmd is the Command key and Option is the Option key. The full list is on the shortcuts page.
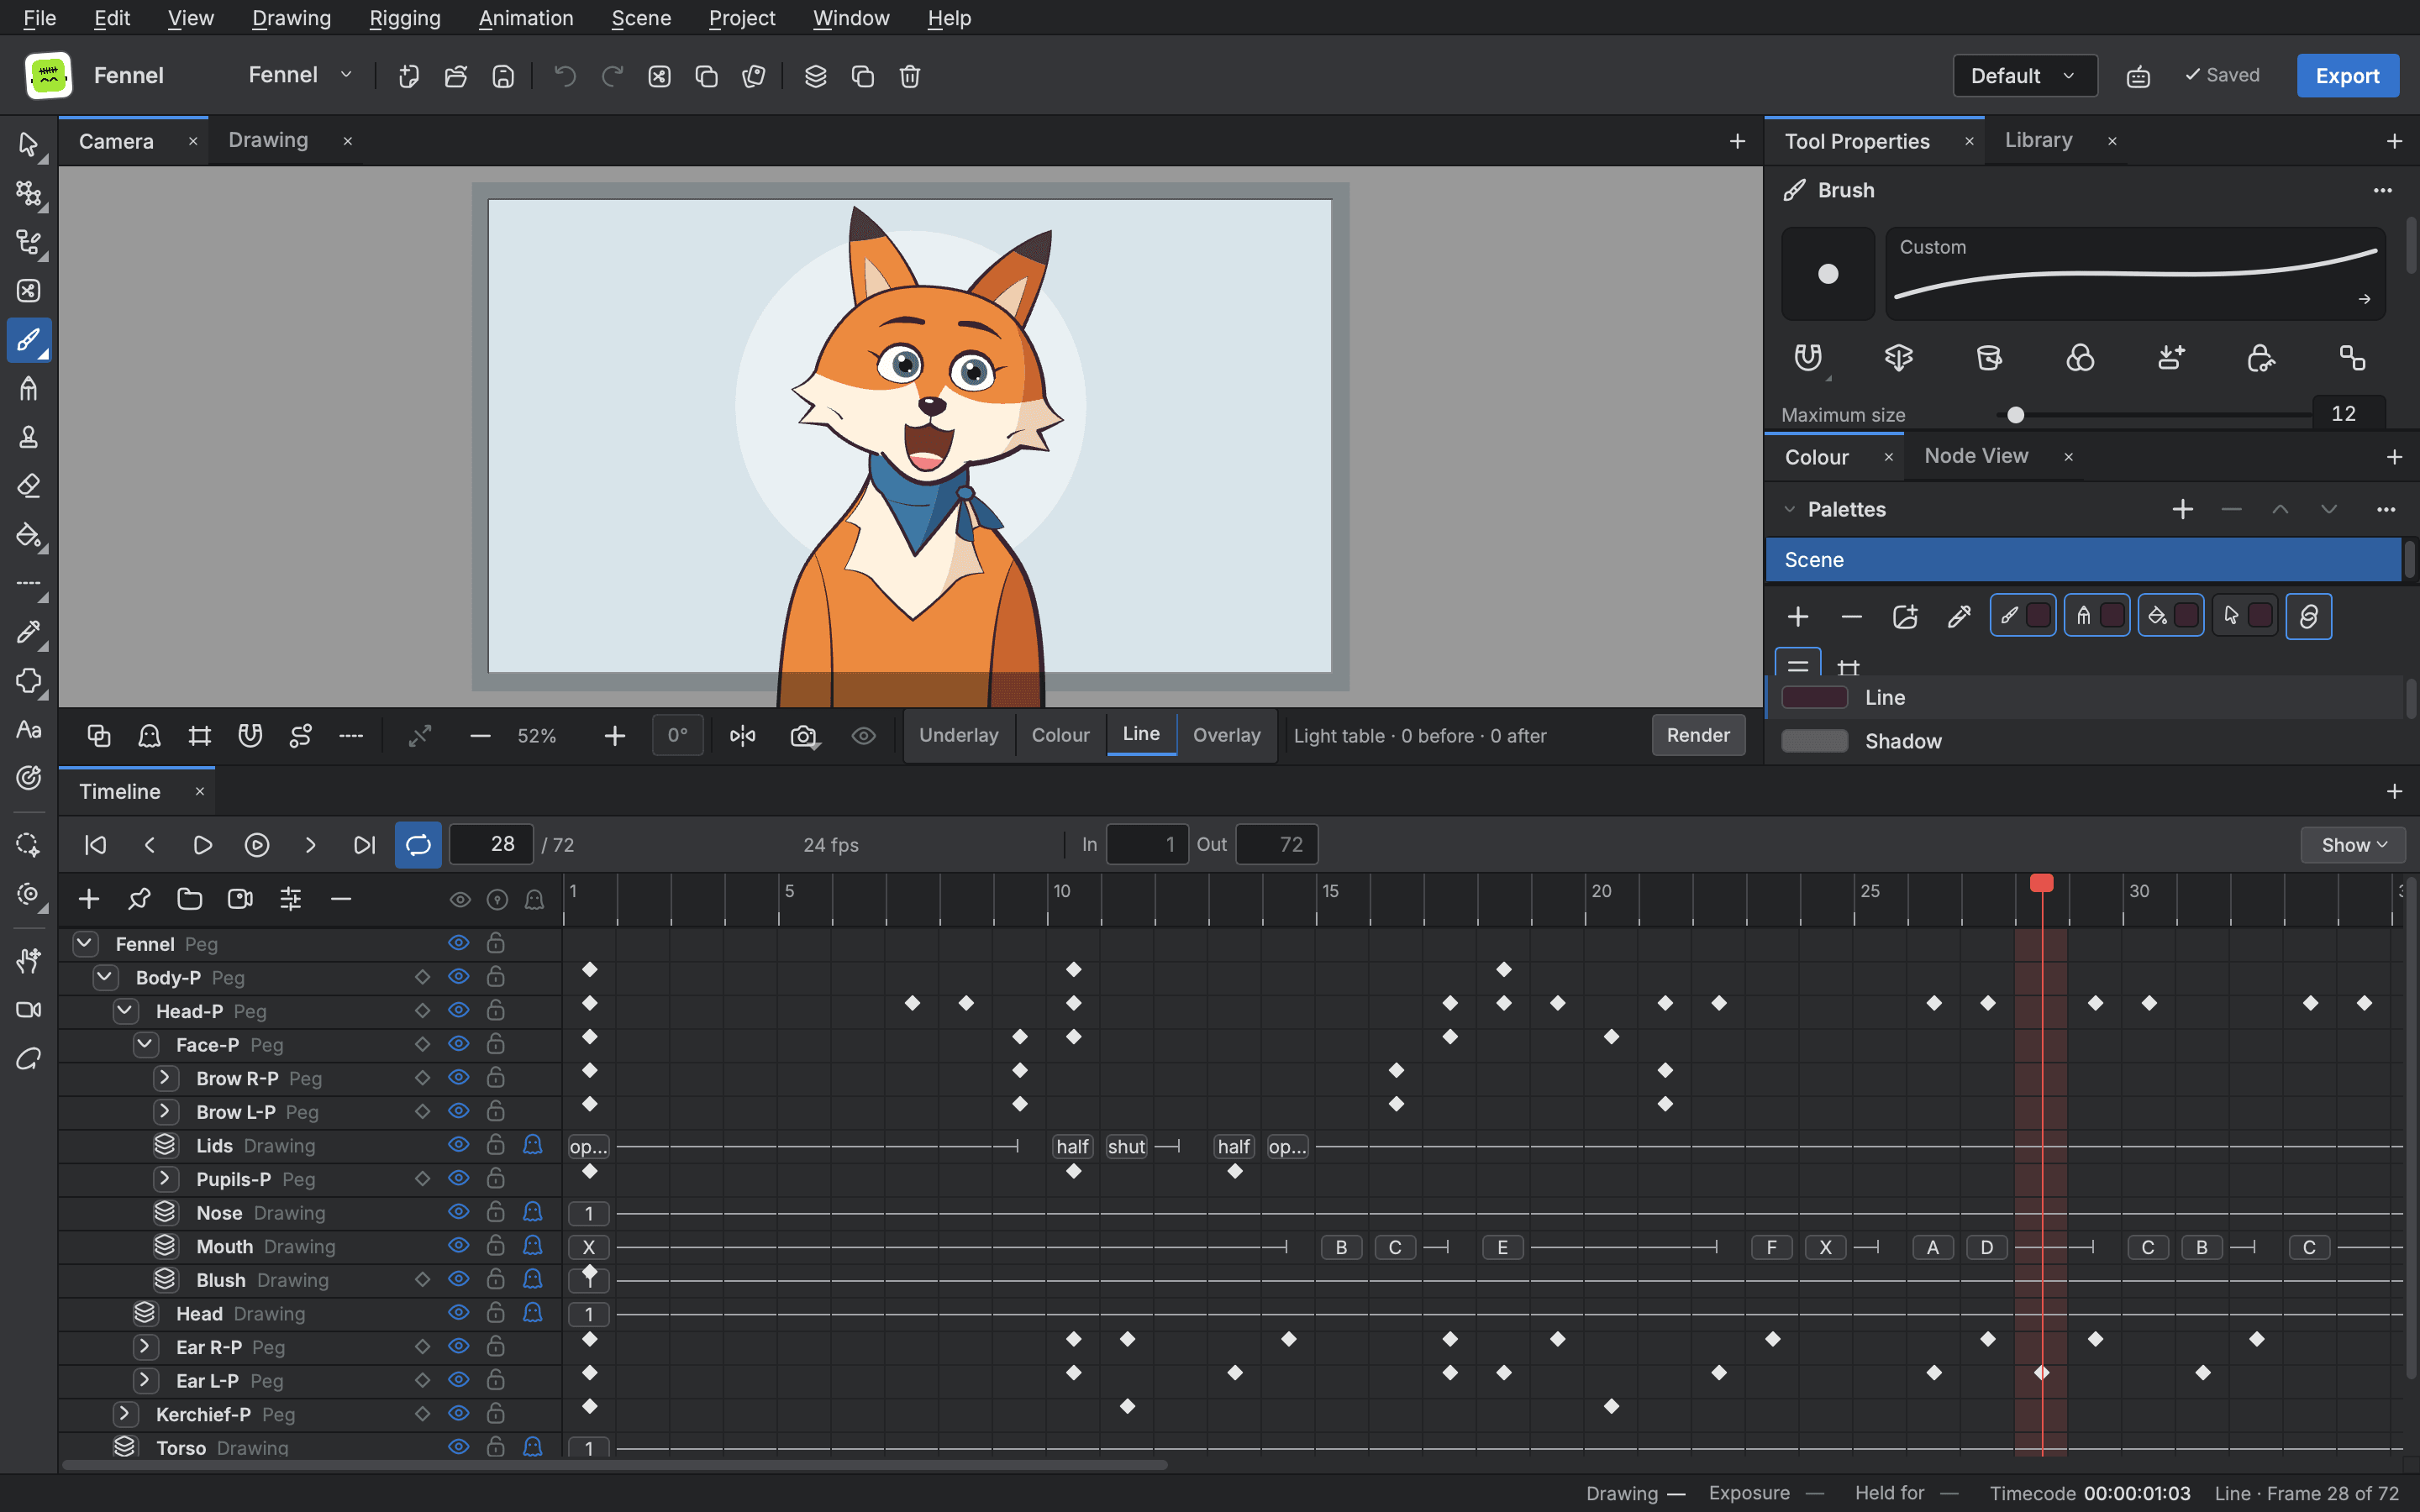
Areas, tabs and views
The middle of the window is made of areas. An area is a row of tabs with one view under it. Each tab is a view, such as Camera, Drawing, Timeline, Xsheet, Function, Node View, Perspective, Library, Tool Properties, Colour or Layer Properties.
To open a view:
- Open the
Windowmenu. It lists every view by name. - Choose the view you want. If it is already open, it comes to the front where it is. If it is closed, it opens.
You can also use the plus button at the right end of an area's tab row (its tool tip says Add view). Its menu lists the views too. For a view that can have several copies, such as the Camera, the plus button opens another copy each time. The Window menu raises the one you already have.
The plus menu also holds three commands for the current tab:
Rename Tab…gives the tab a name of your own.Closecloses the tab.Close Allcloses the area.
Each tab also has its own close button.
Rearrange the layout
Everything below is done with the mouse.
While you drag a tab, a picture of it follows the pointer and a band shows exactly where it will land.
- To reorder tabs in an area, drag a tab along its tab row. It lands where you let go.
- To move a view to another area, drag its tab onto that area's tab row, where it lands between the tabs you let go over, or onto the middle of the area, where it joins the end of the row.
- To split the layout, drag a tab toward the edge of an area and let go. The area splits that way and the view moves into the new half.
- To make a new area between two, drop the tab on the line between them. The new area takes a third of each side.
- To float a view, drag its tab out of the editor and drop it outside every area. It opens in a window of its own.
A floating window moves by its head: press on the empty part of its tab row and drag. Let go over a band and every view in it docks there; let go anywhere else and the window has only moved.
The last area of the window can never be closed, and a tab that is the only one in its area cannot be dropped back on its own area.
To resize, drag the line between two areas. Right click that line to Collapse or Expand the area on one side. Collapse gives the room to the other side and remembers the size, and Expand gives it back. Dragging the line until an area disappears remembers its size the same way, and opening one of its views again gives that size back.
Full screen
Toggle Full Screen is in the View menu and on Cmd+F. Press it once and the window goes full screen. With an area in focus, a second press shows that area alone. A third press returns everything.
Workspaces
A workspace is a saved arrangement of areas, views and toolbars. Buhayin ships five.
| Workspace | What it opens |
|---|---|
Default | Camera, Drawing, Tool Properties, Library, Colour, Node View and Timeline. |
Animating | Timeline, Camera, Colour, Tool Properties, Node View and Library. |
Compositing | Camera, Node View, Perspective, Function, Layer Properties, Tool Properties, Library and Timeline. |
Hand-Drawn | Camera, Drawing, Timeline, Xsheet, Library, Colour and Tool Properties. |
Scripting | Script, Node View, Camera and Timeline. |
To switch, choose a workspace from the dropdown on the bar along the top of the editor, or from Window > Workspace. The one in use is ticked. Switching saves the workspace you leave first, so your changes to it are kept.
To make your own:
- Arrange the views the way you want them.
- Choose
Window > Workspace > Save Workspace As…, or Save workspace as… in the top bar dropdown. - Type a name and confirm. The workspace is saved and becomes the one in use.
Window > Workspace > Save Workspace writes the current arrangement over the workspace you are in.
Manage your workspaces
Choose Window > Workspace > Workspace Manager…, or Workspace manager… in the top bar dropdown. The dialog has two lists.
- Available Workspaces holds every workspace. Copy, Delete and Rename work on the chosen one.
- Toolbar is the list the dropdown and the Workspace menu show, in order. Add puts a workspace on it, Remove takes it off, and Move up and Move down change the order.
Nothing happens until you press Apply or OK. The default workspace cannot be renamed or deleted, and the last workspace is never deleted. A name cannot be empty, cannot use / \ : * ? " < > |, and cannot be one you already use.
If you want the shipped five back as they came, choose Window > Restore Default Workspace. Your own workspaces stay.
Find a command
Window > Command menu… on Cmd+Shift+Space lists every command of the menus and tools in one list. Type to filter it, and press Return to run the one you want. It is the quickest way to find a command you cannot place in the menus.
Keyboard shortcuts
Choose Window > Keyboard shortcuts…, or press ?. The dialog lists every command and its keys.
To change a key:
- Find the command. The search box under the heading jumps to the first command whose name or keys match what you type. Previous and Next step through the matches.
- Press Change on its row and press the keys you want.
- If another command already has those keys, the editor asks whether to Replace, Duplicate or Cancel.
Clear leaves the command with no key. Reset puts back its default keys, and its tool tip names them.
Your changes are kept in a shortcut set. The row above the list holds the set in use. The built in set is named Buhayin. These buttons work on sets:
Newstarts a new set from the keys you have now, and asks for a name.Save Aswrites the set to a file you can share.Loadreads a set from such a file.Deleteremoves a set after asking. The built in set cannot be deleted.
The full default list is on the keyboard shortcuts page.
Preferences
Edit > Preferences… opens the settings in pages (on a Mac, Preferences… sits in the Buhayin menu), among them Appearance, Function Editor, Node View, Color Management, Drawing Mode, Library, Playback View, Render and Storyboard. Changes take effect without a restart. Restore All Defaults puts every setting back.
Appearance
The Appearance page comes first. It sets the theme and the interface's type.
- Theme. Fourteen themes, in a Dark group and a Light group. Dark, the default, and Light are Buhayin's own; the others are High Contrast, One Dark, Monokai, Catppuccin Mocha, Dracula, Nord, Solarized Dark, Gruvbox Dark and Tokyo Night on a dark base, and One Light, Catppuccin Latte and Solarized Light on a light base. Choose a tile and the editor changes at once.
View > Themelists the same themes, and itsAppearance…opens this page. - Interface. The font, Inter by default, or Arimo, the system's font or any font on your computer, and the size: 90, 100, 110 or 125 percent. The text of your scene does not change with it.
Restore Defaults on this page puts back Dark and Inter at 100 percent.
Layout settings
Two General settings change how the layout behaves. Focus On Mouse Enter gives an area the keyboard as soon as the pointer enters it. Shortcut Zooms on Mouse changes how the zoom keys zoom the stage.
The toolbar
Window > Customize Toolbar… chooses which tools sit on the bar at the top of the editor. Pick tools from Available Tools, use Add and Remove, Move up and Move down, and Insert Separator, then Apply or OK. Default puts the standard set back. The Window menu also lists each toolbar, so you can turn one on or off.