
Exporting
Write movies, picture sequences, GIFs, sprite sheets and PDFs.
Export writes your scene out as a movie, a numbered set of pictures, an animated GIF, a sprite sheet, a soundtrack or a printed page. One dialog does most of it. Everything is made on your computer and nothing is uploaded.
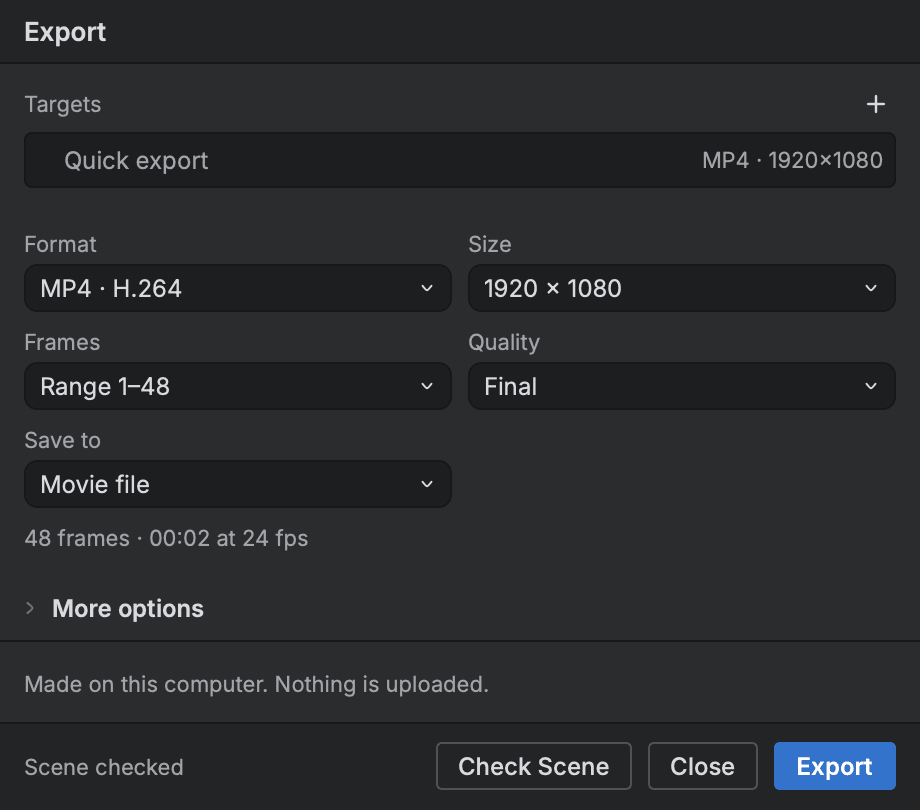
Export a movie
- Choose
FilethenExport…, or pressCmd+Shift+E(Cmd+Shift+Ydoes the same). The blue Export button at the top right of the editor opens the same dialog. - Under Targets, leave
Quick exportselected. It exports without saving a target. - Set Format to
MP4 · H.264,WebM · VP9orMOV · ProRes. - Leave Output on
Movie. It is under More options, which the dialog keeps folded until you open it. - Set Frames. The first choice, named for the whole scene (for example
Scene 1 to 48), writes every frame. Other choices are listed below. - Set Size and Quality. Colour space is under More options too.
- Set Save to to
Movie file. - Press Check Scene if you want Buhayin to look for problems first. It then reports "Scene checked" or how many problems it found.
- Press Export. Choose a file name and a folder. The folder starts at your Downloads folder.
The sound track is written alongside the picture. A movie made of a scene with nothing drawn is refused: the dialog says there is nothing to export.
Which movie format
| Format | Carries |
|---|---|
MP4 · H.264 | H.264 |
WebM · VP9 | VP9 |
MOV · ProRes | ProRes, in Proxy, LT, standard, HQ and 4444 |
ProRes 4444 keeps transparency. For the other ProRes choices, pick the level from the codec list. Set Output to Movie and frames and Buhayin also writes the frames as a PNG sequence beside the movie.
Choose the frames
Frames offers these choices:
| Choice | Writes |
|---|---|
The whole scene, such as Scene 1 to 48 | Every frame |
Range, with its first and last frame | The scene's playback range, when it has one |
Frame N | The frame the editor is on. The choice follows the playhead while the dialog is open |
Custom frames | A first and a last frame you type |
Selected frames | Frames you tick from a list, with Select all and Unselect all. This is for Quick export only |
Nothing exports while no frame is ticked.
Choose the size and colour
Size offers the scene's full size and its shares: 3/4, 2/3, 1/2, 1/3 and 1/4. Custom adds a width and a height you type.
Colour space writes the pictures in the scene's working colour space or another you choose, and tags them with it.
Quality is Final or Draft.
Separation writes only part of the picture instead of the whole of it: Line art, Colour art or Matte. Leave it on Whole picture for a normal export.
Layers lists every layer. All layers writes them all. To export some, pick them in the list. Past eight layers a filter box appears above the list.
Burn in
Burn in puts text on each frame of the export, which is useful for reviews. You can burn in the frame number, the timecode, the scene name, the shot and panel, the dialogue, and a note of your own up to 64 letters. Each is a switch set to On or Off.
Export pictures
- Set Format to a sequence:
PNG sequence · zip,JPEG sequence · zip,TIFF sequence · zip,EXR sequence · ziporPSD sequence · layered. - Set the frames, size and colour space as above.
- Set the format's own fields:
| Format | Fields |
|---|---|
| PNG, TIFF, PSD | Depth: 8 or 16 bits |
| PNG | Colour: with alpha or without |
| TIFF | Compression: LZW or none |
| EXR | Depth: half or full float, and a Compression choice |
| JPEG | JPEG quality, in percent |
| All of them | Frame number: Automatic or 1 to 6 digits, and First number, the number frame 1 takes |
- Set Save to to
Zip fileto get one archive, orFolder · a file eachto write a numbered file for each frame into a folder you choose.
A PSD sequence writes a layered file for each frame. For the formats that can keep transparency, a Background choice appears: Paper · white or Transparent.
Export an animated GIF
- Set Format to
GIF · animatedand Save to toGIF file. - Set Colours, from 256 down to 2. Fewer colours make a smaller file.
- Set Colour reduction to
Selective,AdaptiveorPerceptual. - Set Dithering to
None,Diffusion,PatternorNoise. - Set Transparency to
Off, or toBlack shows through. - Set Loop to
Loop · foreverorPlay once. - Press Export and choose a
.giffile.
Buhayin remembers your GIF choices for next time.
Export a sprite sheet
A sprite sheet lays frames out as one picture with a data file that says where each one is.
- Set Format to
Sprite sheet · PNG + JSON. - Set Layout to the grid or to one of the packed layouts.
- Set Empty frames to
KeeporLeave out, and Repeated frames toKeeporDraw once. A packed sheet can also beTrimmed. - Set Largest sheet, the widest and tallest the sheet may be.
- Press Export.
File then Export Sprite Sheets opens the same dialog already set to a sheet of one layout.
The last format in the list, Skeleton, writes skeleton data as JSON with an image for each attachment, for game engines.
Save a target and render them all
A target is a saved set of export choices, kept with the scene. Use them when you export the same thing again and again.
- Set up the dialog the way you want it.
- Press the
+beside Targets to save it as a target. A target that is already shown offersDuplicate as a new targetinstead. - Tick a target to include it in Render All.
- Press Render All to export every ticked target in turn.
A target that is switched off is skipped by Render all. Only a single run of frames can be saved in a target, which is why Selected frames is for Quick export alone.
Export from a terminal
The app carries a command line tool, buhayin-cli, whose export command writes pictures, movies and sprite sheets from scene files without opening the editor, which suits exporting many scenes in one go. See the command line tool for where it is and how to run it.
Other ways to export
These are all under the File menu:
Quick Frames…opens the Export dialog set to Quick export atDraftquality.Export Audio…opens it on the scene's sound alone, as a WAV file. You choose the sample rate, mono or stereo, and 16 bit or 8 bit.Layout Image…,Layout Image from Selection…andLayout Image from Markers…write a single image of the scene, a selection or its markers. You choose the frames, the format (PNG, JPEG, TIFF or PSD), the size and whether the background is transparent.Export Transformations…writes the motion of pegs and drawings to a file thatImport Transformationsreads back.PrintthenNode View…prints the Node View.
The Xsheet has its own File menu, with Print… and Export PDF…, which write the Xsheet as printed pages. Hidden columns are left out.
In the storyboard window the File menu also has an Export submenu for the board: a PDF, a movie of each shot, a picture of each panel and an edit list. See Storyboarding.
If an export is refused
- Nothing to export: the scene has nothing drawn. Draw something, or check the frames you chose.
- Pick at least one frame: you chose
Selected framesand ticked none. - A skeleton takes one run of frames: choose a single range.
- Press Check Scene and fix what it lists. A missing picture or sound shows up there.