
The Node view and effects
Read a scene as nodes and cables, add effects and see what feeds the picture.
Every scene in Buhayin is a graph of nodes joined by cables. The Timeline shows the graph as rows, and the Node View shows it as it is stored: each layer, peg, effect and the camera as a box, and each cable as a line from one box to the next. Open it when you want to see how a frame is built, add an effect, or fix a join.
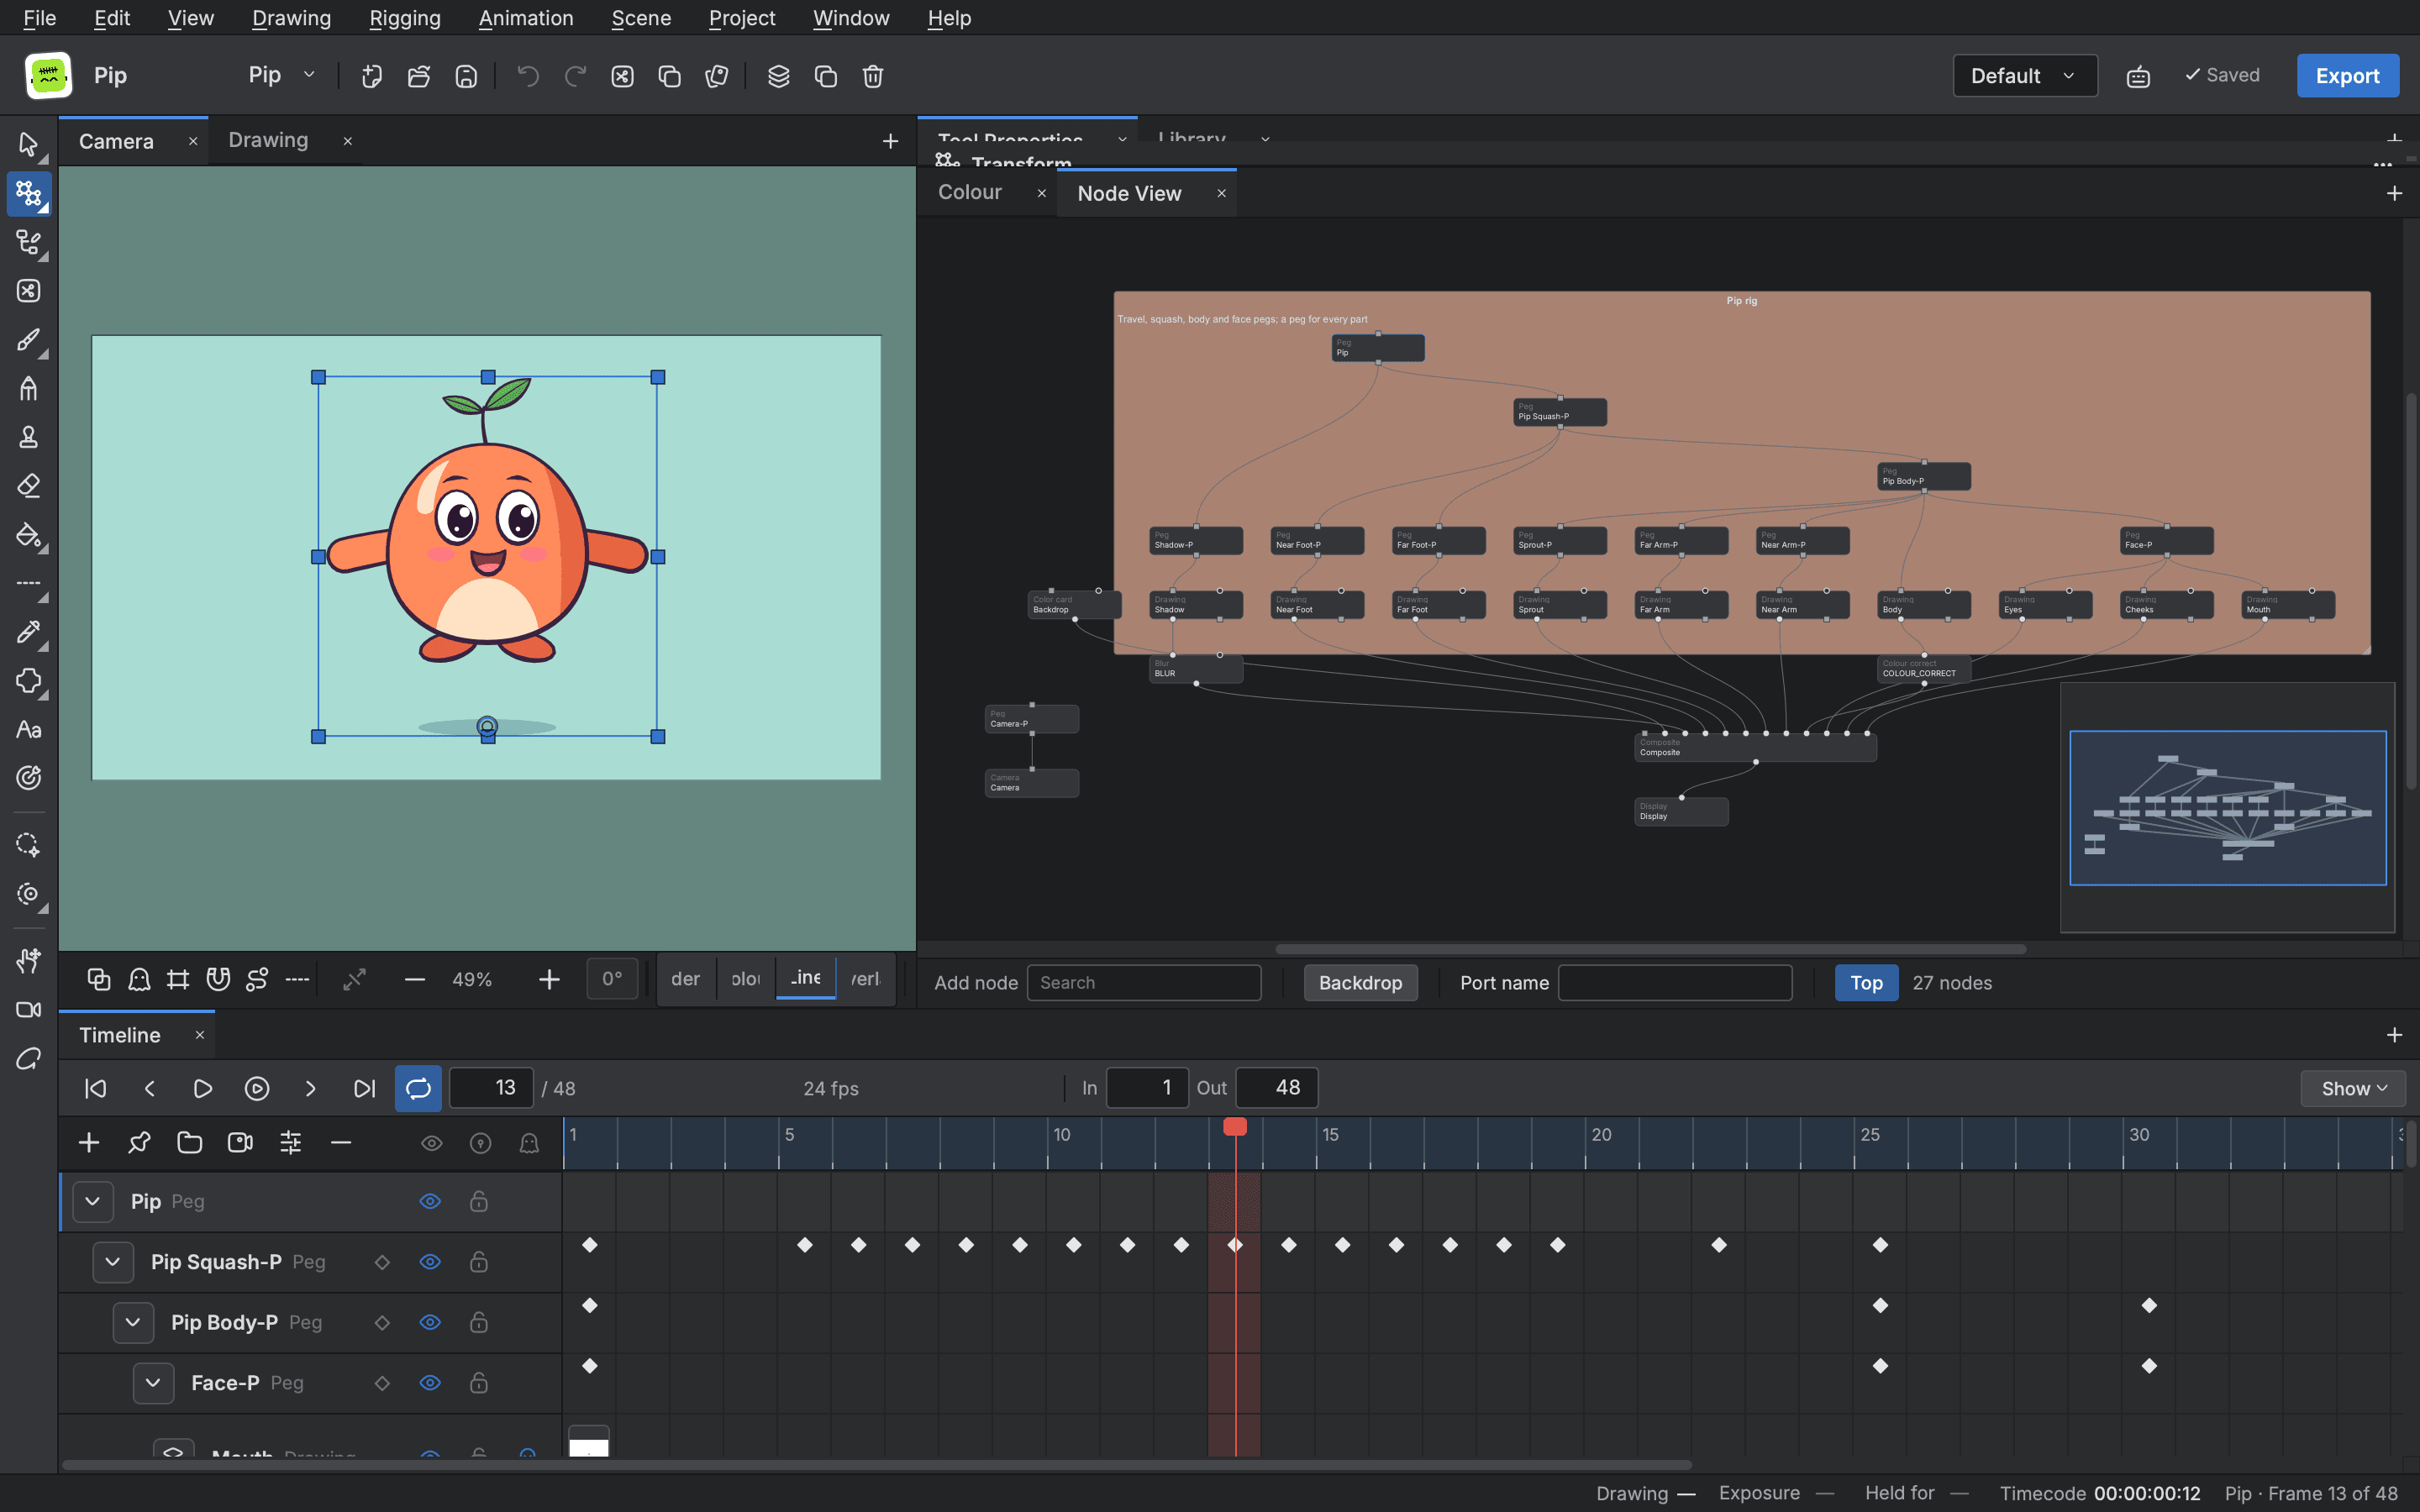
Open the Node View
- Choose
Windowand pickNode View. The Window menu lists every view by name. - The view shows one group of nodes at a time, the top level of the scene when it opens.
- The strip along the bottom holds the ADD NODE search, a
Backdropbutton, a PORT NAME field, the groups you have entered and a count of the nodes.
You can have more than one Node View open at once. Every change you make in it is one step you can take back with Undo.
Read the graph
Each node is a box. Its in ports run along the top edge and its out ports along the bottom edge. A cable runs from an out port to an in port.
The shape of a port tells you what it carries:
| Shape | Carries |
|---|---|
| Square | A matrix, which is where a thing sits, turns and scales |
| Filled circle | A picture |
| Hollow circle | A matte |
A cable into a matte port is drawn dashed. So a join that cannot work is easy to spot: a square port never takes a picture.
Reading a typical character from the top down: a peg carries the matrix, a drawing hangs under it and turns that matrix into a picture, and the pictures run down into a Composite that lays them together. The Composite feeds a Display, which is what you see on the stage.
Move around
| Do this | To get this |
|---|---|
| Scroll the wheel | Zoom about the pointer |
Drag with the middle button, or hold Space and drag | Pan |
Cmd+= and Cmd+- | Zoom in and out |
Hold Z | Show a magnifier |
O | Centre on the first node you picked |
Shift+. | Fit every node in the view |
A map of the whole graph sits in the corner. Cmd+Shift+W shows or hides it.
Pick, move and join
- Click a node to pick it.
Shiftclick adds a node to the pick, andCmdclick adds or removes one. Drag a box from the background to pick the nodes it crosses. - Drag a node to move it. Everything you picked moves together, and the scene remembers where you left it.
- To join two nodes, press on an out port and drag to an in port. While you drag, the view writes beside the pointer why a port will not take the cable. Let go over a port that accepts it and the cable is made.
- To move a cable, pick it up by its end and drop it on another port. Drop it on empty space and it is taken away.
Escapedrops a drag in progress. With no drag, it puts down what you picked.
Cmd+A picks every node, Cmd+Shift+I picks the others, and Cmd+C, Cmd+X and Cmd+V copy, cut and paste. Delete takes away what you picked with its cables and does not ask first, so use Undo if you did not mean it.
Add a node
There are three ways.
- Type in ADD NODE in the bottom strip. The matches drop up in three groups: layers, effects, and every other kind of node. Choose one and it lands in the middle of what you can see.
- Put the pointer where you want the node and press
Return. The same search opens at the pointer. - Open the
Node Libraryview from the Window menu. It lists every node type by category, with a search of its own. Double click a type to add it, or drag it onto the canvas.
A node you drop onto a cable that nothing covers is cut into that cable and joined through its first ports that fit. A new node is named for its type, such as Blur, and a second one is Blur_1.
You can also right click for the Insert menu, which makes a Composite, a Cutter, a Display, a drawing layer, a Group, a Peg, a Parent Peg or a Backdrop where the pointer is.
Add an effect
An effect is a node that sits on a layer's cable and changes its picture.
- Pick the layer in the Timeline so it is the current layer.
- Choose
ScenethenAdd effectand pick the effect from the list. The Timeline's add menu has the same list under Effects. - The effect appears in the graph right after the layer. Open
Layer Properties(Shift+E) to set its values.
What the effects cover:
- Blur: Blur, Directional Blur, Radial Blur, Radial Zoom, Box Blur and Matte Blur.
- Light and shadow: Glow, Drop Shadow, Tone, Bloom, Backlight, Highlight, Ambient Occlusion and Cast Shadow.
- Colour and pixels: Colour Correct, Brightness-Contrast, Colour-Scale, Colour Override, Pixelate, Median, Unsharp Mask, Negate, Grey Scale and Channel Swap.
- Keyers and noise: Chroma Keying, RGB Difference Keyer, Grain and Turbulent Noise.
- Depth and motion: Focus Set and Focus Apply for depth of field, Motion Blur, Shake and Quake.
A Blend node sets how a picture lays on what is below it, with 26 modes from Multiply and Screen to Colour Dodge and Linear Dodge.
Mattes
A matte cuts a picture. A Cutter cuts a picture by a matte, and you can invert it to keep what is outside the matte. The matte can be made of one drawing or several. A cable into a matte port is drawn dashed. A Matte Composite combines up to eight inputs, each with its own operation and invert, into one matte.
Group, label and keep tidy
Cmd+Gputs the picked nodes in a new group, named for the first node, orGroupfor several.Cmd+Shift+Gdoes the same and adds a Composite inside, so the group has one picture out.Cmd+Returngoes into the picked group.Cmd+Shift+Returngoes back out. Double clicking a group also goes in.- The
Backdropbutton puts a coloured rectangle behind what you picked. Double click it to set its title, a description and one of 17 colours. Dragging a backdrop carries the nodes inside it. - A Note node, from the library, holds a few lines of text. Double click it to type.
Cmd+Returnkeeps the text.
The crumbs in the bottom strip name the groups you are inside. Click one to go back up.
Cache a node
A node that is slow to work out can be cached, so the stage shows a kept picture of it instead of working it out each frame.
- Right click the node and tick Cache.
- A small mark appears in the node's top right corner. A dot means the stage shows a kept picture. A ring means it is live: the node is selected, or Node Caching is off.
- After you change something underneath it, use
Recalculate SelectedorRecalculate Allin the right click menu, or in the Scene menu, to empty the kept pictures.
Thumbnails show a small picture of what a layer gives at the current frame inside its box. Press T to switch them on for the picked nodes, and Option+T to hide them all.
Send the result out
Two kinds of node end a graph. A Display shows the result, and a Write node exports it. Turn a Write node off or on from the Scene menu with Enable/Disable Write. When you export, the Export dialog skips a Write node that is off.